粉体行业在线展览
粉体行业在线展览


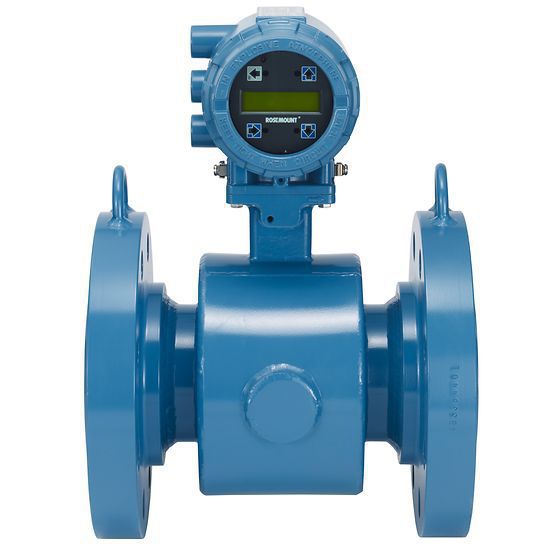
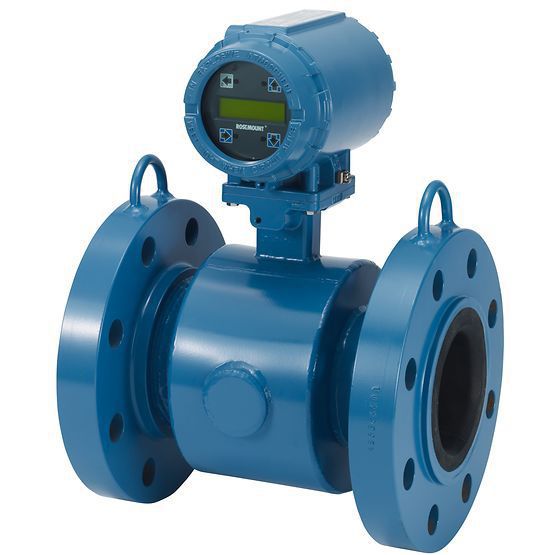
FHW-15AFCG


直接联系
福雪莱冷暖设备(东莞)有限公司


东莞
1-5万元
福雪莱
FHW-15AFCG
618
FHW-15AFCG系列恒温槽是利用最先进的半导体的热-电效应来控制制冷制热(又称为珀耳帖效应)的仪器。它具有耐电压高、功耗低、阻燃、响应时间疾速、使用寿命长(可连续使用10年以上)等特性。运行无振动、节能、不耗氧气、安全性能高、不需制冷剂、体积小、重量轻等特点。发热量容易调节及受电源电压波动影响小等一系列其它传统机器无法比较的优点。
恒温方面采用高级铂热电阻(Pt100)进行数据采集和用世界知名品牌温控器进行温度的恒定调节,从而精确控制制冷制热的转换。该仪器具有控温精度高、波动度小等特点且具有多种报警指示。
支持RS-485通信和标准的MODBUS通信。
可用于非常洁净的工作空间;仪器工作稳定可靠,操作方便安全,适用于更高要求的试验场所。
广泛适用于太阳能电池、生物工程、医药、食品、化工、半导体制造等领域。为用户提供高精度的、受控的、温度均匀的恒温场源,是研究院、高等院校、工厂实验室、各种半导体设备、理想的恒温设备。
高精度风冷型恒温槽用户手册
适用于FHW-15AFCG
版本号:Ver.3.17
(2022-4-16)
广东福雪莱电气有限公司
尊敬的用户:
感谢您选择、使用广东福雪莱电气有限公司的产品。为了方便您使用,请仔细阅读本说明书,并按说明书的步骤操作。
使用时无论有什么问题,请按照此说明书的电话、地址联系,我们时刻恭候为您服务。
由于产品的改进和换代,您所使用的设备可能与说明书中介绍不完全一致,谨此致歉, 福雪莱公司不承担任何错误、遗漏或不准确的责任。
注 意
在使用恒温槽之前,请详细阅读使用说明书,并特别注意其中注意事项的内容。
只有在使用、维护过程中严格遵照制造商的建议,才能使设备的性能达到设计的水准。
严禁非专业人员在设备正常使用时非法进行各类操作。
除非另有约定,本文档仅作为使用指导,所有陈述、信息和建议不构成任何明示或暗示的担保。
广东福雪莱电气有限公司.
地址:广东省东莞市虎门镇沙角社区鸿兴路6号
服务电话:0769-8******* 13682302959(黄先生)
传真:0769-8*******
网址: E-mail:fuxuelai********
目录
一 概述
二 主要技术参数
三 信号简介
四 电气接口
五 使用操作流程:
六 注意事项:
七 装箱清单:
八 温控器简易说明:
九 称重控制器简易说明:
FHW-15AFCG系列恒温槽是利用***的半导体的热-电效应来控制制冷制热(又称为珀耳帖效应)的仪器。它具有耐电压高、功耗低、阻燃、响应时间疾速、使用寿命长(可连续使用10年以上)等特性。运行无振动、节能、不耗氧气、安全性能高、不需制冷剂、体积小、重量轻等特点。发热量容易调节及受电源电压波动影响小等一系列其它传统机器无法比较的优点。
恒温方面采用高级铂热电阻(Pt100)进行数据采集和用世界知名品牌温控器进行温度的恒定调节,从而精确控制制冷制热的转换。该仪器具有控温精度高、波动度小等特点且具有多种报警指示。
支持RS-485通信和标准的MODBUS通信。
可用于非常洁净的工作空间;仪器工作稳定可靠,操作方便安全,适用于更高要求的试验场所。
广泛适用于太阳能电池、生物工程、医药、食品、化工、半导体制造等领域。为用户提供高精度的、受控的、温度均匀的恒温场源,是研究院、高等院校、工厂实验室、各种半导体设备、理想的恒温设备。
u 源瓶冷阱尺寸:φ160mmX160mm
u 额定电压:220V~240V 50Hz/60HZ
u 额定功率:500W
u 额定电流:2.3A(220V) 防护等级:IP21
u 控温范围:15 ~ 45℃
u 使用环境温度:5~40℃
u 控温精度:静态≤0.2℃
u 外形尺寸(长X宽X高):390mmX290mmX300mm
电源指示灯(绿色,标识为“POWER”) 1处;
温控器报警指示灯(红色,标识为“T.A”) 1处;
温控器 (温度控制器,标识为“Temperature ”) 1处 ;
2 厘米液位预警指示灯(黄色,标识为“2CM”) 1 处;
1 厘米液位报警指示灯(红色,标识为“1CM”) 1 处;
称重显示器 (称重控制仪表,标识为“Electronic scale ”) 1处;
蜂鸣报警器(间续声,在设备内部,无标识) 1处。
设备通电后该指示灯常亮。
**开机后未到达设定温度温控器不报警,到达设定温度后若温差大于2度(默认,可调整)时该指示灯常亮,该指示灯亮时COM2口1脚与5脚导通。
液位接近或低于 2CM,但高于 1CM 时该指示灯常亮,该指示灯亮时 COM2 口 1 脚与 4 脚导通。
液位接近或低于 1CM 时该指示灯常亮,该指示灯亮时 COM2 口 1 脚与 3 脚导通。
温控器报警指示灯亮时蜂鸣报警器发出间续声。
1、电气接口主要有以下四处
品字型电源插座 (设备后部,标识为“AC220V”) 1处
温度传感器插座 (设备顶部,圆形插孔无标识) 1处
COM1接口(设备顶部,DB9K母头插座,RS485接口,标识为“COM1”) 1处
COM2接口(设备顶部,DB9K公头插座,设备状态接口,标识为“COM2”) 1处
2、品字型电源插座(标识为“AC220V”)
本机采用220V 50Hz/60HZ交流电工作,设备包装箱内配备一条带漏电保护开关的电源线。为保障您在使用过程中的人身安全,请使用时务必使用,否则后果自负。注意:敬请使用本公司原装插头线(本机标配一条),一定不可以使用不带漏电保护的电源线代替。
3、温度传感器插座(圆形插孔标识为:TEMP)
本设备包装箱内配备两条本公司定制的温度传感器,必须把温度传感器插入温度传感器插座,温度传感器没有接入、接入不到位、损坏、型号不符时,恒温槽表面的温控器“PV”值将显示为“S.ERR”
4、 COM1接口(DB9K母头插座,标识为“COM1”)
引脚 | 定义 | 说明 |
1 | Data+ | 485+ pin |
2 | Data- | 485- pin |
3 | 空 | |
4 | 空 | |
5 | 空 | |
6 | 空 | |
7 | 空 | |
8 | 空 | |
9 | 空 |
5、COM2接口(DB9K公头插座,标识为“COM2”)
引脚 | 定义 | 说明 |
1 | COM | 输出信号公共端 |
2 | 空 | |
3 | 1CM | 液位低于1cm报警信号 |
4 | 2CM | 液位低于2cm预警信号 |
5 | T.A | 温度报警信号 |
6 | Power alarm | 断电报警 |
7 | 空 | |
8 | 空 | |
9 | 空 |
6、其它
A.温控器报警。更换源瓶后**次降温到离设定温度+2度(默认,可调整);通源后温度超过2度(默认,可调整)时COM2口1脚与5脚导通。
B.2CM处液位低预警。液位接近或低于2CM,但高于1CM时COM1口1脚4脚导通。
C.1CM处液位低报警。液位接近或低于1CM时COM1口1脚与3脚导通,并发出声光报警。
D.1CM液位报警和2CM液位预警不会同时发生,1CM报警后2CM报警消失。
E.三组报警共用一个COM端(未与本机电源相连),报警的开关负载**不超过2A。
F.温控器报警方式可更改为其它温控方面的异常报警。
强酸、强碱、强腐蚀性液体或气体会损坏本设备。若源瓶内液体有强酸、强碱、强腐蚀性、有毒液体时,操作本设备前必须做好防护措施,并且在有专人监护下才可进行如下操作。
A. 确认使用环境安全,设备无异常后,取下前保温盒;
B. 将源瓶轻轻放进设备,源瓶放置好后1厘米液位报警指示灯和2厘米液位预警指示灯均不亮;
C. 盖好保温盖绵(黑色圆形,本机附件),轻轻合上前保温盒;
D. 在源瓶中放温度检测传感器的小玻璃管中滴入导热油(白色塑料瓶内液体,本机附件),导热油液位离低部高度在25~65mm,然后插入温度传感器至底部;
E. 确保电源开关处于关闭状态后接入电源;
F. 打开电源开关;
G. 调整好预设温度,温度到达设定温度恒定一段时间后开始工作;
H. 使用完成后关闭电源开关;
I. 断开设备电源后清洁机台。
1、必须详细阅读本说明书后方可对本系列设备进行操作;
2、安装控制器的地点应无振动源,应有防日晒、防高温烘烤、防冻、防潮、防雨淋措施。电源功率要大于设备的额定功率,仪器必须要有良好的“接地”装置;
3、机器内有交流220V电子元器件,请勿擅自打开,以免发生触电危险;
4、不要将设备置于环境温度超过使用环境温度的地方工作;
5、设备在工作时会发热,因此要保持工作环境的良好通风,以免温度过高而损坏机器;
6、非专业人士未经许可,请不要试图拆开设备,不要私自维修,以免发生意外事故或加重设备的损坏程度;
7、定期要用无尘纸或无尘布对设备进行清洁保养,保养时请注意不要让水等液体流入设备内部;
8、环境温度过高或通风不良时通源后温度也会波动更大;
9、使用环境有较大变化时要重新更改PID参数;
10、使用环境温度低于设定温度时,温度的恒定方式将由靠制冷恒定变为靠辅助加热来恒定(辅助加热无独立PID)当通过辅助加热来恒定温度时,温度控制精度会降低;
11、设备两侧要确保通风良好,否则将影响使用性能;
12、在电源中使用干扰滤波器时,请在确认电压和电流的基础上,尽可能安装在靠近数字调节器的位置。
设置时请尽可能远离产生强高频率的设备( 高频电焊机、高频缝合机等) 和产生浪涌的设备。
· 请在额定范围内使用电源电压以及负载。
· 为了使电源电压能在2 秒内达到额定电压,请通过开关和继电器等的接点迅速施加电压。如果缓慢施加电压,可能会发生电源没有复位或输出误动作等情况。
序号 | 名称 | 数量 | 备注 |
1 | 主机 | 1台 | 含前保温盒 |
2 | 电源线 | 1条 | 带漏电保护 |
3 | 热白油 | 1瓶 | 50ML |
4 | 温度传感器 | 1条 | PT 100 |
5 | 保温盖绵 | 1块 | |
6 | 说明书 | 1份 | |
7 | 合格证 | 1份 | |
8 | 温控器设置软件光盘 | 选配 | |
9 | 通信线 | 选配 | USB转485 |
10 | DIY触摸屏 | 选配 | |
11 | 外包装箱 | 1 | 460*370*450mm |
|
① 测量值(PV)显示屏
运行模式:显示测量的当前值(PV); 设定模式:显示内部参数名。
② 设定值(SV)显示屏
运行模式:显示要控制的设定值(SV); 设定模式:显示该参数设定值。
③ 单位(℃/℉/%)显示灯:在参数 3 组的显示单位[Unt]下,显示设定的单位。
④ 手动控制显示灯:手动控制时点亮。
⑤ 多段设定值(SV)显示灯:当使用 SV 功能时,SV 1~3 中相应的指示灯亮。
⑥ 自整定(Auto-Tuning)显示灯:执行自整定功能时,该指示灯以 1 秒为周期。
⑦ 报警输出(AL1, AL2)显示灯:相应报警输出 ON 时,灯亮。
⑧ 控制输出(OUT1, OUT2)显示灯:相应控制输出 ON 时,灯亮 。
SSRP 功能模型(TK4□-□4S□)的周期控制/相位控制时,操作量在 5.0%点亮。
※使用电流输出,手动控制时,若操作量 0.0%时,控制输出显示灯灭灯,其他情况保持亮灯。自动控制时,操作量在 3.0%以上时,灯亮,2.0%以下时灭灯。
⑨ (MODE)键:用于进入参数设置组,复位运行模式,参数组切换,设定值保存。
⑩ ← ↓ ↑键:用于进入目标值设置模式,位数移动,变更参数设定值(位数)。
⑪ 数字输入键:同时按↓ ↑键 3 秒,在参数 5 组数字输入键[ d1-y ]下,实现设定的功能(RUN/STOP,报警输出解除,自整定)
清零/返回键 移位键 数据调整键 菜单/确认键
HI:上限输出指示灯 OK:中限输出指示灯
LO:下限输出指示灯
:短按进行清零操作(在主界面);
进入二级菜单之后短按进行翻项选择;
进入设置激活状态后,短按取消激活状态;
二级菜单下长按选项键3秒退出到主界面。
:主界面长按移位键3秒直接进入标定界面;
二级菜单参数设置界面,短按激活设置;
激活设置状态之后短按移动数字光标;
在称重界面短按进行清皮操作。
: 进入二级菜单之后调整数据的大小;
进入一级菜单之后选择各主菜单;
在主界面短按该键选择上排显示:实时测量值、峰值、模拟量值,输入状态,输出状态。
: 在主界面长按3秒进入一级菜单;
在一级菜单短按确定键进入二级菜单;
在二级菜单内修改完数据短按确认键写入;
在主界面短按,进入上中下限设定界面。
4.校验标定
(主显示界面)
长按 3秒
将传感器空置,待上排显示数码稳定,
短按 标定零点
将砝码放到传感器工装上,
待下排显示数码稳定,短按
将砝码保持在传感器工装上,
将砝码重量输入到上面显示框,短按
砝码校准结束
(主显示界面)
长按 3秒
将传感器空置,待上排显示数码稳定,
短按 标定零点
在此界面短按 进入无砝码标定
输入传感器的灵敏度,短按
输入传感器的量程,短按
无砝码校准结束
5.菜单详细说明
长按 3秒
短按
短按
短按
短按
从一级菜单进入二级菜单短按 即可进入
AIR-COOLED HIGH-PRECISION THERMOSTATIC BATH
Customer Instruction Manual
Applicable to FHW-15AFCG
Ver.3.17
(2022-4-16)
Fuxuelai Cold&Warm Equipment (Dongguan) Co., Ltd.
Dear:
Thanks for purchasing FUXUELAI high-precision thermostatic bath.
No matter what problem you have, please contact us according to the telephone number and address of this manual.
Due to product improvement and replacement, the equipment you use may not be exactly the same as described in the instruction manual. We apologize. We accepts no responsibility for any errors, omissions or inaccuracies.
Notes
Before using the thermostatic bath, please read the instructions carefully and pay special attention to the notes in the instructions.
Only in the use, the maintenance process strictly comply with the manufacturer's advice, in order to make the performance of the equipment to achieve the design level.
Non-professionals are strictly prohibited from conducting any illegal operation during normal use of the equipment.
Unless otherwise agreed, this document is intended as a guide to use only, and all statements, information and recommendations do not constitute any warranty, express or implied.
Fuxuelai Cold&Warm Equipment (Dongguan) Co., Ltd.
Addres:No. 6 of HongXing Road,Shajiao community,Humen town,Dongguan city,Guangdong province
Website:
E-mail:fuxuelai********
TEL:0769-8*******
TEL:13682302959
©2020~2021 Fuxuelai Cold&Warm Equipment Inc.
Contents
一 Introduction 1
二 Technical Data 1
三Signal Guides 2
四Connections 3
五Use and care guides 5
六Cautions 6
七Packing List 7
八Temperature Controller Instructions 7
九Weighing controller instructions 9
FHW-15AFCG series of thermostats are instruments that use the thermal-electric effects of the most advance semiconductors to control cooling heating, which also known as the Peltier Effect). The thermostats are high voltage resistance, low power consumption, flame retardant, rapid response and durable (more than 10-year durability in average). Energy saving, no oxygen consumption, high safety, no refrigerant consumption, small size, light weight and no vibration in working. And there are more advantages, such as ease of adjustment of heat value and very minor affect by voltage change.
To precisely control the conversion of cooling and heating, the thermostats use platinum thermistor (pt100) to collect data and use the top temperature controller in the world to maintain the constant temperature. The thermostats is high-precision and low volatility. Multiple alarm styles.
Support RS-485 communication and standard MODBUS communication.
The thermostats is stable and reliable, easy to operate and safe. The thermostats is highly recommended for high requirements of testing purpose and very clean work space.
Wildly used in the areas of the manufacturing for Solar cell, Bioengineering, Pharmaceuticals, Food, Chemical and Semiconductor. It can provide users with high-precision, controlled, temperature constant field. It is ideal for research institute, institutions of university, factory laboratories and semiconductor equipment.
u Source tank cold trap dimensions: φ160mm X 160mm
u Nominal voltage: 220V~240V 50Hz/60HZ
u Rated power: 450W
u Rated current: 2.0A(220V)IP grade: IP21
u Temperature control range: 15 ~ 40℃
u Working environment temperature: 5~45℃
u Precision: static state 0.2℃
u Overall dimensions (L W H): 390mmX290mmX300mm
1. 7 indicators and buzzer alarm.
Power indicator (Green with POWER mark) x 1
Temp indicator (Red, with T.A mark) x 1
Temp controller (Temperature mark) x 1
2cm liquid level indicator (Yellow, with 2CM mark) x 1
1cm liquid level indicator (Red, with 1CM mark) x 1
Electric scale monitor (with Electronic Scale mark) x 1
Buzzer alarm (inside instrument, no label) x 1
2. Power indicator (Green with POWER mark)
Light on when power on.
3. Temp indicator (Red, with T.A mark)
The light is OFF when below the setting temperature. The light is ON when the temperature is 2 degrees higher than the setting temperature. When the light is on, pins 1 and 2 in COM2 are connected.
4. 2cm liquid level indicator (Yellow, with 2CM mark)
The light is ON when the liquid level is lower than 2CM and higher than 1CM. The pins 1 and 4 in COM2 are connected when light is on.
5. 1cm liquid level indicator (Yellow, with 1CM mark)
The light is ON when the liquid level is lower than 1CM. The pins 1 and 3 in COM2 are connected when light is on.
6. Buzzer alarm (inside instrument, no label)
The buzzer alarm when Temperature Indicator is ON.
1. 4 connections
Power connection (at the rear, labeled as AC220V) x 1
Thermal sensor connection (On top, round hole with no label) x 1
COM1 connection (On top, DB9K connection, labeled as COM1) x 1
COM2 connection (On top, DB9K connection, labeled as COM2) x 1
2. Power connection (at the rear, labeled as AC220V)
The nominal power of the machine is 220V 50Hz/60HZ AC. 1 cable with earth leakage circuit breaker is included in the package. Caution: please use the cable supplied by our company. Do not use none earth leakage circuit breaker cable. Otherwise, personal injury or property damage might occur.
3. Thermal sensor connection (On top, round hole with label TEMP)
There are 2 thermal sensors included in the carton. The thermal sensor should be plugged in the thermal sensor connection. The PV value on the thermal monitor is “S.ERR” if the thermal sensor is not connected properly, damaged or on incorrect model.
4. COM1 connection (On top, DB9K female connection, labeled as COM1)
Pin | Definition | Description |
1 | Data+ | 485+ pin |
2 | Data- | 485- pin |
3 | Empty | |
4 | Empty | |
5 | Empty | |
6 | Empty | |
7 | Empty | |
8 | Empty | |
9 | Empty |
5. COM2 connection (On top, DB9K male connection, labeled as COM2)
Pin | Definition | Description |
1 | COM | Signal output public terminal |
2 | Empty | |
3 | 1CM | liquid level lower than 1cm alarm |
4 | 2CM | liquid level lower than 2cm alarm |
5 | T.A | Temperature Alarm |
6 | Power alarm | Power off alarm |
7 | Empty | |
8 | Empty | |
9 | Empty |
6. Additional info
A. Temperature alarm. The first time temperature cooling to the setting temperature +2 degree (default value, can be set) after the source tank is replaced.
Pins 1 and 5 in COM2 are connected once the power on and the temperature is higher than 2 degree (default value, can be set).
B. 2CM alarm. The pins 1 and 4 in COM1 are connected when liquid level is lower than 2CM and higher than 1CM.
C. 1CM alarm. The pins 1 and 3 in COM1 are connected when liquid level is lower than 1CM.
D. 1CM and 2CM alarms should not be happen at the same time
E. 3 sets of alarm use a common COM (not connect to the power source). The max current for alarm is 2A.
F. Temperature alarm style can be changed to the other alarm style.
Strong acid, strong base, strong corrosive liquid or gas could damage the machine. Please wear protective suit when operating if the source tank contains strong acid, strong base, strong corrosive or toxic liquid or gas. Please only operate with the assistance of a guardian.
A. Make sure the environment and the machine are safe, remove the front insulation box.
B. Place the source tank into machine. The 1cm and 2cm liquid level indicator are OFF when then source tank is in proper position.
C. Cover the source tank with insulation cotton. Replace front insulation box.
D. Add 25-65mm conduction oil into the small tube for temperature sensor. Insert temperature sensor into tube. The end tip of temperature sensor should touch the bottom of small tube.
E. Make sure the power switch is OFF. Plug the power cord.
F. Turn power switch ON.
G. Set up the target temperature. The machine start working when temperature rise to the target temperature for a couple of minutes.
H. Ture power OFF after using.
I. Unplug the power cord and clean the machine.
1. Read the instruction manual before operate the machine.
2. Make sure there is NO vibration source close to the machine. And there are solarization, high temperature, freezing and rain proof. The power must be large than rating power. The machine must be earthing.
3. There are 220V AC electric parts in machine. Do not disassemble the machine if you are not a qualified expert. Otherwise injury or property damage could be happen.
4. Do not place the machine in the environment where the temperature is higher than the rating working temperature.
5. The machine is getting hot in working. Make sure the working environment is well ventilated to protect the machine from being damaged by over heat.
6. Unauthorized expert, please do NOT disassemble and repair the machine. Otherwise the machine could be damaged or personal injury or property damage could occur.
7. Maintain the machine regularly with dust-free paper or fabric. Make sure no water or liquid leak into machine.
8. Temperature change more after power ON if the environment temperature is too high or poor ventilation.
9. The PID parameters need to be changed if the working environment changing obviously.
10. The temperature constant method will change from chilling constant to heating constant when the working temperature is lower than the setting temperature. The temperature control accuracy could be lower when maintain the temperature with heating constant.
11. There must be well ventilated around machine, otherwise the performance of the machine could be affected.
12. Verify the voltage and current, the interference filter should be installed close to the digital governer if the interference filter is required for the power.
Please keep the high-frequent and surging equipment away when setting up.
· Use the power voltage and load according to the rating value.
· Increase the voltage rapidly by the connections of switch and relay to make the voltage approaching the rating voltage in 2 seconds. The power might not reset or malfunction could be happen.
Key | Description | Qty | Note |
1 | Machine | 1 | Including front insulation cover |
2 | Power cord | 1 | Leakage protection |
3 | Conduction Oil | 1 | 50ML |
4 | Temperature sensor | 1 | PT 100 |
5 | Thermo insulation foam | 1 | |
6 | Instruction Manual | 1 | |
7 | Certification | 1 | |
8 | Temperature controller setting media | Optional | |
9 | Communication cable | Optional | USB to 485 |
10 | DIY touch panel | Optional | |
11 | packaging box | 1 | 460*370*450mm |
1. Measurements (PV) display
Operation mode: Display the current value of measurement (PV); Setup mode: Display internal parameter name.
2. Setting Value (SV) Display
Operation mode: Display the set value (SV) to be controlled; Setup mode: Display the parameter settings.
3. Display light in units (//%): under the display unit [Unt] of the parameter group 3, display the set unit.
4. Manually control the display light: Light up when manually controlled.
5. Multi-Segment Setting Value (SV) Display light: When using the SV function, the corresponding indicators in SV 1-3 are on.
6. Auto-Tuning display light: When the self-tuning function is performed, the light cycle is 1 second.
7. Alarm output (AL1, AL2) display light: When the corresponding alarm output ON, the light is on.
8.Control output (OUT1, OUT2) display light: When the corresponding control output ON, the light is on.
When the SSRP function model (TK4-4S) is under cycle/phase control, the operation amount is 5.0%.
_When using current output and manual control, if the operation amount is 0.0%, the control output display light goes out, otherwise the light remains on. In automatic control, when the operation amount is more than 3.0%, the lamp turns on and the lamp turns off when the operation amount is less than 2.0%.
9. (MODE) key: used to enter parameter settings group, reset operation mode, switch parameter groups, save settings.
10. key: used to enter the target value setting mode, digit movement, change parameter setting value (digits).
11. Digital Input Key: Press_key for 3 seconds at the same time, and realize the set functions (RUN/STOP, alarm output released, self-tuning) under 5 sets of digital input keys with parameters [d1-y]
1.Control panel instructions
2.Indicator light instructions
HI: Upper limit output indicator
LO: Lower limit output indicator
OK: Medium limit output indicator
3. Keys and shortcut instructions
Quick press to clear (in main interface)
Quick press to change tab in sub manual.
Quick press to cancel activity in setting activity status.
Press 3 seconds to return to main interface in sub manual.
In main interface, press 3 seconds to go setting interface.
In sub interface, quick press to active setting.
In setting status, quick press to move curse.
In weighing interface, quick press to clear the additional weight.
In sub menu, quick press to adjust the value.
In main menu, quick press to select tab.
In main interface, quick press to select the top of the value: measured value, peak value, simulation value, input/ output status.
In main interface, press 3 seconds to go sub menu.
In main menu, quick press to go sub menu.
In sub menu, quick press to confirm the setting.
In main interface, quick press to go the upper, medium, lower limits setting interface.
4.Demarcate Calibration
A. Sensor weight demarcate
Main interface
Press 3 seconds
Clear the sensor value until the upper value is fixed.
Quick press to clear demarcate.
Put the weight on sensor fixture.
When the lower value is fixed, quick press ENT button.
Keep the weight on sensor fixture.
Input the weight to the upper value, quick press ENT button.
Weight calibration is completed.
B. No weight demarcate
No weight demarcate
Main interface
Press 3 seconds
Clear the sensor value until the upper value is fixed.
Quick press to clear demarcate.
Quick press to do no weight demarcate.
Input the sensor sensitivity value, quick press ENT button.
Input the sensor measuring range, quick press ENT button.
No weight calibration is completed.
5.Menu instructions
Press ENT button 3 seconds.
Quick press
Quick press
Quick press
Quick press
Go to sub menu, Quick press ENT button to go the setting menu.